
protocols
Spore and root extraction from pot cultures
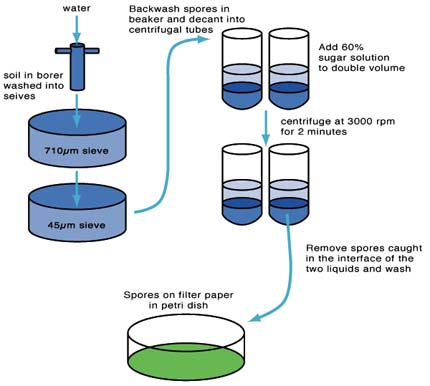
- Remove soil sample from the rhizosphere of the host plant growing in the pot with a 10-20mm diameter core borer
- wash the soil through 710µm and 45µm pore sieves with running water
- remove root material trapped on the 710µm sieve to check for attached mycelium of AMF with spores or for staining of roots (Trypan blue, Chlorazole Black E, Alkaline Phosphatase, Acid Fuchsin etc.) if required
- backwash the contents of the 45µm sieve into a small beaker. Try to keep the volume to a minimum
- swirl the beaker contents and quickly decant the contents into 50ml centrifuge tubes up to a maximum half way up the tube
- gently inject an equal amount of a 60% (w/v) commercial sugar (sucrose) solution into the pellet at the bottom of each tube using a syringe with a plastic tube extension. There should be a clear interface visible between the water (above) and sugar phase (below)
- centrifuge the capped tubes at approx. 3000 rpm for 2 minutes in a bench centrifuge
- remove the spores caught at the interface of the two layers with the syringe and tube attachment. Start above the interface and work down into the sugar phase using a circular motion as some species produce spores which can sink in the sugar solution while others can float just above the interface
- pour the contents of the syringe into a clean 45µm sieve and wash thoroughly to remove traces of sugar solution
- backwash contents into a Petri dish and view under a stereomicroscope.
Slide preparation – spore
Making a permanent slide mount for reference or BEG registration
- After extracting spores from a fresh pot culture (see spore extraction via button link above). Isolate a minimum of 20 spores
- on two clean microscope slides place one drop each of the mountant PVLG (Polyvinyllactoglycerol) and Melzer's PVLG
- transfer half the spores to the first drop of mountant and the second half to the second drop using fine tip forceps (e.g. VOMM Ltd., Germany). Try and orientate the spores so that distinguishing features will be apparent once the coverslip is added
- carefully place a clean coverslip over each drop, making sure to lower the coverslip at an angle to prevent air bubbles being trapped
- gently apply a pressure to the coverslips of one of the slides to break open the spores. Wait 30 seconds and then apply gentle pressure in a circular motion with a soft (B) pencil to break spore walls open further (The pressure will depend on the species of AMF). This should be done under a stereomicroscope
- if using PVLG, remember to allow the mountant to polymerise and top-up it up as necessary before sealing with clear nail varnish or white/silver car paint (Touch-up paint sold in most DIY centres)
- label the slide at one end with the species name and reference code, date, your name, and the mountant used.
